3D Arcade Simplex Game
 (You should read the Module1-3D-Programming and the One-Time Setup before you continue)
INTRODUCTION
The first kind of game you should know how to program is what I call the 3D Arcade Simplex Game. This is a game with one hero, one monster, and one projectile, all drawn with simple polygons. Think of it as a kind of “Hello World” for 3D video games—it lets you test basic input, processing, and output.
It’s also a rapid prototyping and experimentation environment, which let’s you experiment with 3D engine functions, basic movement, basic monster AI, and basic attack. Everything you learn here will generalize to more complex 3D games. You can even replace the polygons with more complex meshes once you get the logic down.
So memorize & understand this code, and you’ll be on your way. After each step, you should load the code in your browser (ctrl-O, then navigate to the file) and make sure nothing is crashing.
Please feel free to contact me on Twitter, @ProfessorF, if you have any questions. I don’t care how simple they are, just contact me! I’m happy to help.
STEP 0: ADD SKELETON HTML CODE
<!doctype html>
<html>
<head>
<script src="babylon.max.js"></script>
<script>
</script>
<style>
body    {width:100%; height:100%; padding:0; margin:0; background:red;}
#cvGame {width:100%; height:100%; padding:0; margin:0; background:skyblue;}
</style>
</head>
<body>
<canvas id="cvGame"></canvas>
</body>
</html>
Explanation. Skeleton HTML Code is code that changes very little from game to game. I underlined two key pieces of code. The first is the script tag that loads the 3D Game Engine, babylon.max.js (or simply “Babylon”). The second is the canvas tag, which is where Babylon will draw your game. The canvas has been set to fill 100% of the browser.
[For more info on HTML, read Mozilla’s HTML Documentation & Tutorials]
STEP 1: ADD BABYLON/JAVASCRIPT SKELETON CODE
<!doctype html>
<html>
<head>
<script src="babylon.max.js"></script>
<script>
window.addEventListener("DOMContentLoaded", init);
function init()
{
    canvas=document.getElementById("cvGame");
    engine=new BABYLON.Engine(canvas);


    scene=new BABYLON.Scene(engine);
    light=new BABYLON.HemisphericLight("sun", new BABYLON.Vector3(0,1,0), scene);
    ground=BABYLON.MeshBuilder.CreateGround("mGround", {width:1000,height:1000}, scene);
    ground.material = new BABYLON.StandardMaterial("gMat", scene);
    ground.material.diffuseColor=new BABYLON.Color3(0,.5,0);

    camera =new BABYLON.FreeCamera("mCam", new BABYLON.Vector3(0,6,-50), scene);
    camera.attachControl(canvas);

    engine.runRenderLoop(gameloop);
}
function gameloop()
{
    scene.render();
}
</script>
<style>
body    {width:100%; height:100%; padding:0; margin:0; background:red;}
#cvGame {width:100%; height:100%; padding:0; margin:0; background:skyblue;}
</style>
</head>
<body>
<canvas id="cvGame"></canvas>
</body>
</html>
Explanation. Like the HTML skeleton code, this is code that doesn’t change much from game to game. Memorize this. To memorize, it’s helpful to think of each “paragraph” in init() as follows:
- A game is drawn into a canvas by a game engine. So you need to get the canvas, and instantiate the game engine.
- Game engines draw scenes. So you need to create a scene, then populate the scene with objects. A minimum scene contains a light and at least one object. In our example, this object is a green ground.
- The user can’t see anything in the scene until you add a camera, position it, and attach control of the camera to the canvas.
- Finally, once the scene is all set up, you need to tell the engine where the game loop. Every game has a game loop that draws the the scene continuously, and hopefully at 60fps—updating all movement, changes, and displays.
[For more info on Javascript, read Mozilla’s Javascript Documentation & Tutorials]
STEP 2: ADD A HERO, A MONSTER, AND A BOOM (MISSILE)
<!doctype html>
<html>
<head>
<script src="babylon.max.js"></script>
<script>
window.addEventListener("DOMContentLoaded", init);
function init()
{
    canvas=document.getElementById("cvGame");
    engine=new BABYLON.Engine(canvas);

    scene=new BABYLON.Scene(engine);
    light=new BABYLON.HemisphericLight("sun", new BABYLON.Vector3(0,1,0), scene);
    ground=BABYLON.MeshBuilder.CreateGround("mGround", {width:1000,height:1000}, scene);
    ground.material = new BABYLON.StandardMaterial("gMat", scene);
    ground.material.diffuseColor=new BABYLON.Color3(0,.5,0);

    hero = BABYLON.MeshBuilder.CreateCylinder("cHero", {height:10,diameterBottom:10,diameterTop:0}, scene);
    hero.material=new BABYLON.StandardMaterial("mHero", scene);
    hero.material.diffuseColor=new BABYLON.Color3(0,0,1);
    hero.position=new BABYLON.Vector3(-20, 5, 0);
    hero.rotation.z=-Math.PI/2;

    mons= BABYLON.MeshBuilder.CreateCylinder("cMons", {height:10,diameterBottom:10,diameterTop:0}, scene);
    mons.material=new BABYLON.StandardMaterial("mMons", scene);
    mons.material.diffuseColor=new BABYLON.Color3(1,0,0);
    mons.position=new BABYLON.Vector3(20, 5, 0);
    mons.rotation.z=-Math.PI/2;

    boom = BABYLON.MeshBuilder.CreateCylinder("cBoom", {height:10,diameterBottom:4,diameterTop:0}, scene);
    boom.material=new BABYLON.StandardMaterial("mBoom", scene);
    boom.material.diffuseColor=new BABYLON.Color3(1,.5,0);
    boom.position=new BABYLON.Vector3(0,5,20);
    boom.rotation.z=-Math.PI/2;

    camera =new BABYLON.FreeCamera("mCam", new BABYLON.Vector3(0,6,-50), scene);
    camera.attachControl(canvas);
    engine.runRenderLoop(gameloop);
}
function gameloop()
{
    scene.render();
}
</script>
<style>
body    {width:100%; height:100%; padding:0; margin:0; background:red;}
#cvGame {width:100%; height:100%; padding:0; margin:0; background:skyblue;}
</style>
</head>
<body>
<canvas id="cvGame"></canvas>
</body>
</html>
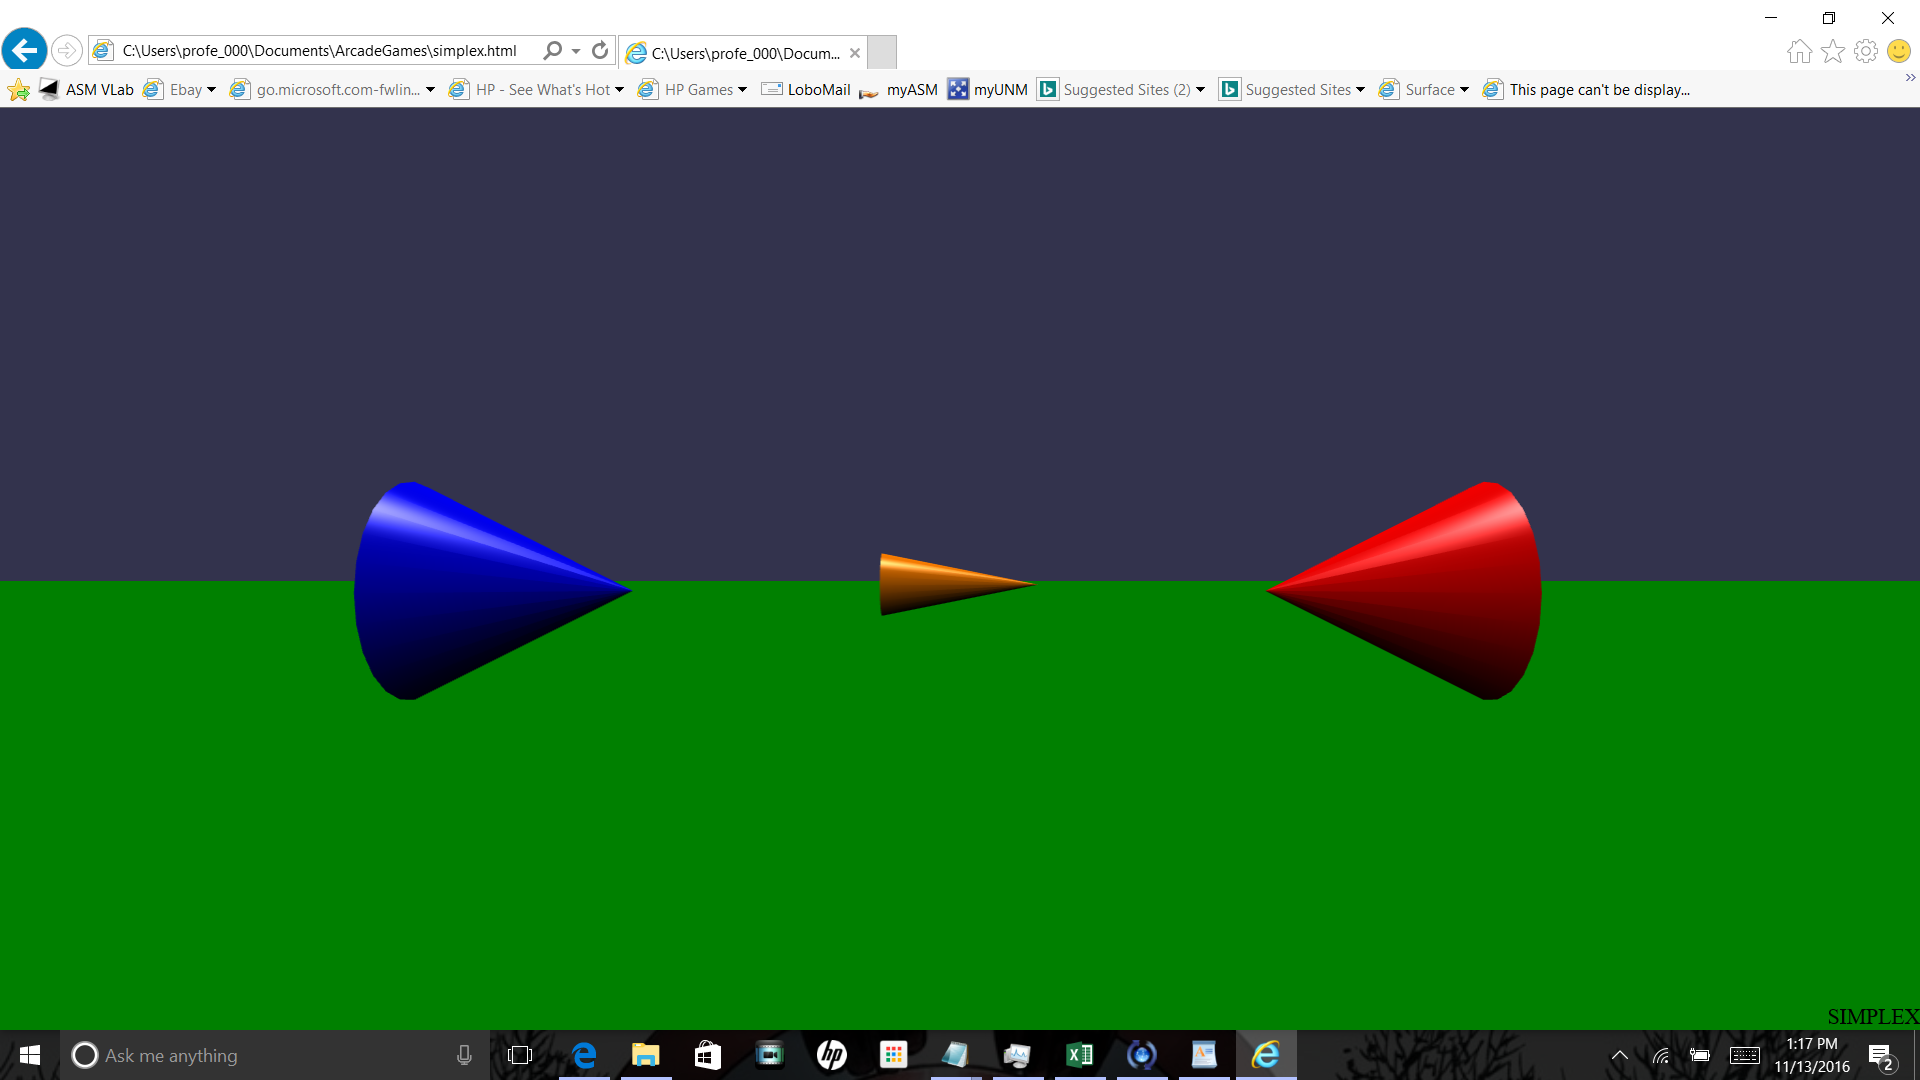
Explanation. We use Babylon’s MeshBuilder factory to add cylinders representing our hero, monster, and missile (boom!). I chose cylinders as graphical primitives because you can make them into cones by setting their diameterTop properties to zero. When you draw a cylinder, Babylon centers it at the origin 0,0,0. So we must at least reposition cylinders up by 1/2 their heights (5 is half of 10). I also moved the hero to the left 20 units, the monster to the right 20 units, and the missile into the screen 20 units.
Coordinate system. There are 3 dimension, X,Y, & Z. Looking at your screen, +X is to the right, +Y is up, and +Z is into your screen. The ground plane is an XZ plane with Y=0.
Materials. The default color for an object is gray. To make it another color you must instantiate a material and set its diffuse color property. I made the hero blue, monster red, and the missile orange.
[For more info on Babylon basic objects, read Babylon.js MeshBuilder Documentation or Babylon.js MeshBuilder Tutorial. For info on materials, read Babylon Material Tutorial]
STEP 3: ADD HERO CONTROL
<!doctype html>
<html>
<head>
<script src="babylon.max.js"></script>
<script>
window.addEventListener("DOMContentLoaded", init);
window.addEventListener("keydown", herocontrol);
function init()
{
    canvas=document.getElementById("cvGame");
    engine=new BABYLON.Engine(canvas);

    scene=new BABYLON.Scene(engine);
    light=new BABYLON.HemisphericLight("sun", new BABYLON.Vector3(0,1,0), scene);
    ground=BABYLON.MeshBuilder.CreateGround("mGround", {width:1000,height:1000}, scene);
    ground.material = new BABYLON.StandardMaterial("gMat", scene);
    ground.material.diffuseColor=new BABYLON.Color3(0,.5,0);

    hero = BABYLON.MeshBuilder.CreateCylinder("cHero", {height:10,diameterBottom:10,diameterTop:0}, scene);
    hero.material=new BABYLON.StandardMaterial("mHero", scene);
    hero.material.diffuseColor=new BABYLON.Color3(0,0,1);
    hero.position=new BABYLON.Vector3(-20, 5, 0);
    hero.rotation.z=-Math.PI/2;

    mons= BABYLON.MeshBuilder.CreateCylinder("cMons", {height:10,diameterBottom:10,diameterTop:0}, scene);
    mons.material=new BABYLON.StandardMaterial("mMons", scene);
    mons.material.diffuseColor=new BABYLON.Color3(1,0,0);
    mons.position=new BABYLON.Vector3(20, 5, 0);
    mons.rotation.z=-Math.PI/2;

    boom = BABYLON.MeshBuilder.CreateCylinder("cBoom", {height:10,diameterBottom:4,diameterTop:0}, scene);
    boom.material=new BABYLON.StandardMaterial("mBoom", scene);
    boom.material.diffuseColor=new BABYLON.Color3(1,.5,0);
    boom.position=new BABYLON.Vector3(0,5,20);
    boom.rotation.z=-Math.PI/2;

    camera =new BABYLON.FreeCamera("mCam", new BABYLON.Vector3(0,6,-50), scene);
    camera.attachControl(canvas);
    engine.runRenderLoop(gameloop);
}
function gameloop()
{
    scene.render();
}
function herocontrol(event)
{
    switch (event.key) {
        case 'a':
            hero.rotation.y-=Math.PI/180;
        break;
        case 'd':
            hero.rotation.y+=Math.PI/180;
        break;
        case 'w':
            heroang=-hero.rotation.y;
            herospd=1;
            herodx=Math.cos(heroang)*herospd;
            herodz=Math.sin(heroang)*herospd;
            hero.position.x+=herodx;
            hero.position.z+=herodz;
        break;
        case 's':
            heroang=-hero.rotation.y;
            herospd=1;
            herodx=Math.cos(heroang)*herospd;
            herodz=Math.sin(heroang)*herospd;
            hero.position.x-=herodx;
            hero.position.z-=herodz;
        break;
        case 't':
            camera.position.y=200;
            camera.position.x=camera.position.z=0;
            camera.rotation.x=Math.PI/2;
        break;
    }
}
</script>
<style>
body    {width:100%; height:100%; padding:0; margin:0; background:red;}
#cvGame {width:100%; height:100%; padding:0; margin:0; background:skyblue;}
</style>
</head>
<body>
<canvas id="cvGame"></canvas>
</body>
</html>
Explanation. To make your hero move, you have to add a keypress event handler. The math for movement is basic trigonometry, which you should have learned in middle- or high-school. A-key rotates counter-clockwise. D-key rotates clockwise. W-key moves the hero forward, and the S-key moves the hero backwards. I also made the T-key position the camera at the top, pointing down.
Y-rotation wonkyness. Rotations in the Y-axis are backwards from what you learned in trigonometry: positive angles are clockwise, and negative angles are counter-clockwise.
Camera rotation wonkyness. By default, a camera is created at 0,0 and looking into the screen. You control the camera looking up or down by rotating about the X-axis. Looking straight down is a positive 90-degree rotation.
[For more information on the keyboard event handler, see Mozilla’s KeyboardEvent API]
[Contact me on Twitter @ProfessorF for a personal trigonometry lesson]
STEP 4: ADD MONSTER AI
<!doctype html>
<html>
<head>
<script src="babylon.max.js"></script>
<script>
window.addEventListener("DOMContentLoaded", init);
window.addEventListener("keydown", herocontrol);
function init()
{
    canvas=document.getElementById("cvGame");
    engine=new BABYLON.Engine(canvas);

    scene=new BABYLON.Scene(engine);
    light=new BABYLON.HemisphericLight("sun", new BABYLON.Vector3(0,1,0), scene);
    ground=BABYLON.MeshBuilder.CreateGround("mGround", {width:1000,height:1000}, scene);
    ground.material = new BABYLON.StandardMaterial("gMat", scene);
    ground.material.diffuseColor=new BABYLON.Color3(0,.5,0);

    hero = BABYLON.MeshBuilder.CreateCylinder("cHero", {height:10,diameterBottom:10,diameterTop:0}, scene);
    hero.material=new BABYLON.StandardMaterial("mHero", scene);
    hero.material.diffuseColor=new BABYLON.Color3(0,0,1);
    hero.position=new BABYLON.Vector3(-20, 5, 0);
    hero.rotation.z=-Math.PI/2;

    mons= BABYLON.MeshBuilder.CreateCylinder("cMons", {height:10,diameterBottom:10,diameterTop:0}, scene);
    mons.material=new BABYLON.StandardMaterial("mMons", scene);
    mons.material.diffuseColor=new BABYLON.Color3(1,0,0);
    mons.position=new BABYLON.Vector3(20, 5, 0);
    mons.rotation.z=-Math.PI/2;

    boom = BABYLON.MeshBuilder.CreateCylinder("cBoom", {height:10,diameterBottom:4,diameterTop:0}, scene);
    boom.material=new BABYLON.StandardMaterial("mBoom", scene);
    boom.material.diffuseColor=new BABYLON.Color3(1,.5,0);
    boom.position=new BABYLON.Vector3(0,5,20);
    boom.rotation.z=-Math.PI/2;

    camera =new BABYLON.FreeCamera("mCam", new BABYLON.Vector3(0,6,-50), scene);
    camera.attachControl(canvas);
    engine.runRenderLoop(gameloop);
}
function gameloop()
{
    monsdx=hero.position.x-mons.position.x;
    monsdz=hero.position.z-mons.position.z;
    monsang=Math.atan2(monsdz,monsdx);
    monsspd=0.05;
    mons.position.x+=Math.cos(monsang)*monsspd;
    mons.position.z+=Math.sin(monsang)*monsspd;
    mons.rotation.y=-monsang;

    scene.render();
}
function herocontrol(event)
{
    switch (event.key) {
        case 'a':
            hero.rotation.y-=Math.PI/180;
        break;
        case 'd':
            hero.rotation.y+=Math.PI/180;
        break;
        case 'w':
            heroang=-hero.rotation.y;
            herospd=1;
            herodx=Math.cos(heroang)*herospd;
            herodz=Math.sin(heroang)*herospd;
            hero.position.x+=herodx;
            hero.position.z+=herodz;
        break;
        case 's':
            heroang=-hero.rotation.y;
            herospd=1;
            herodx=Math.cos(heroang)*herospd;
            herodz=Math.sin(heroang)*herospd;
            hero.position.x-=herodx;
            hero.position.z-=herodz;
        break;
        case 't':
            camera.position.y=200;
            camera.position.x=camera.position.z=0;
            camera.rotation.x=Math.PI/2;
        break;
    }
}
</script>
<style>
body    {width:100%; height:100%; padding:0; margin:0; background:red;}
#cvGame {width:100%; height:100%; padding:0; margin:0; background:skyblue;}
</style>
</head>
<body>
<canvas id="cvGame"></canvas>
</body>
</html>
Explanation. The monster AI is pretty simple. Based on the hero’s position, the monster points at the hero and moves towards the hero. The variable monsspd controls how fast the monster moves. Again, the movement is based on the same trigonometry used to move the hero—the main difference is that the monster’s angle depends on the hero’s position not a keystroke.
Game Loop. Note that because the monster’s movement is automatic, the code goes inside of the game loop. Anything that needs to move automatically must go in the game loop. That goes for the missile as well.
STEP 5: ADD MISSILE CONTROL
<!doctype html>
<html>
<head>
<script src="babylon.max.js"></script>
<script>
window.addEventListener("DOMContentLoaded", init);
window.addEventListener("keydown", herocontrol);
function init()
{
    canvas=document.getElementById("cvGame");
    engine=new BABYLON.Engine(canvas);

    scene=new BABYLON.Scene(engine);
    light=new BABYLON.HemisphericLight("sun", new BABYLON.Vector3(0,1,0), scene);
    ground=BABYLON.MeshBuilder.CreateGround("mGround", {width:1000,height:1000}, scene);
    ground.material = new BABYLON.StandardMaterial("gMat", scene);
    ground.material.diffuseColor=new BABYLON.Color3(0,.5,0);

    hero = BABYLON.MeshBuilder.CreateCylinder("cHero", {height:10,diameterBottom:10,diameterTop:0}, scene);
    hero.material=new BABYLON.StandardMaterial("mHero", scene);
    hero.material.diffuseColor=new BABYLON.Color3(0,0,1);
    hero.position=new BABYLON.Vector3(-20, 5, 0);
    hero.rotation.z=-Math.PI/2;

    mons= BABYLON.MeshBuilder.CreateCylinder("cMons", {height:10,diameterBottom:10,diameterTop:0}, scene);
    mons.material=new BABYLON.StandardMaterial("mMons", scene);
    mons.material.diffuseColor=new BABYLON.Color3(1,0,0);
    mons.position=new BABYLON.Vector3(20, 5, 0);
    mons.rotation.z=-Math.PI/2;

    boom = BABYLON.MeshBuilder.CreateCylinder("cBoom", {height:10,diameterBottom:4,diameterTop:0}, scene);
    boom.material=new BABYLON.StandardMaterial("mBoom", scene);
    boom.material.diffuseColor=new BABYLON.Color3(1,.5,0);
    boom.position=new BABYLON.Vector3(0,5,20);
    boom.rotation.z=-Math.PI/2;
    boomdx=boomdz=0;

    camera =new BABYLON.FreeCamera("mCam", new BABYLON.Vector3(0,6,-50), scene);
    camera.attachControl(canvas);
    engine.runRenderLoop(gameloop);
}
function gameloop()
{
    monsdx=hero.position.x-mons.position.x;
    monsdz=hero.position.z-mons.position.z;
    monsang=Math.atan2(monsdz,monsdx);
    monsspd=0.05;
    mons.position.x+=Math.cos(monsang)*monsspd;
    mons.position.z+=Math.sin(monsang)*monsspd;
    mons.rotation.y=-monsang;

    boom.position.x+=boomdx;
    boom.position.z+=boomdz;
    scene.render();
}
function herocontrol(event)
{
    switch (event.key) {
        case 'a':
            hero.rotation.y-=Math.PI/180;
        break;
        case 'd':
            hero.rotation.y+=Math.PI/180;
        break;
        case 'w':
            heroang=-hero.rotation.y;
            herospd=1;
            herodx=Math.cos(heroang)*herospd;
            herodz=Math.sin(heroang)*herospd;
            hero.position.x+=herodx;
            hero.position.z+=herodz;
        break;
        case 's':
            heroang=-hero.rotation.y;
            herospd=1;
            herodx=Math.cos(heroang)*herospd;
            herodz=Math.sin(heroang)*herospd;
            hero.position.x-=herodx;
            hero.position.z-=herodz;
        break;
        case 't':
            camera.position.y=200;
            camera.position.x=camera.position.z=0;
            camera.rotation.x=Math.PI/2;
        break;
        case 'Enter':
            boom.position.x=hero.position.x;
            boom.position.z=hero.position.z;
            boom.rotation.y=hero.rotation.y;
            boomang=-boom.rotation.y;
            boomspd=1;
            boomdx=Math.cos(boomang)*boomspd;
            boomdz=Math.sin(boomang)*boomspd;
        break;
    }
}
</script>
<style>
body    {width:100%; height:100%; padding:0; margin:0; background:red;}
#cvGame {width:100%; height:100%; padding:0; margin:0; background:skyblue;}
</style>
</head>
<body>
<canvas id="cvGame"></canvas>
</body>
</html>
Explanation. Spacebar fires the missile. In a more realistic game, the player would have to move over the missile to pick it up. We can do that later as a mod. For now, pressing the Enter key moves the missile over the player, and shoots the missile in the direction the player is facing.
The math, once again, is the same trigonometry used to move the player: determine a dx and dz based on the angle, and move the missile by adding dx and dz to the player’s position. Boomspd controls how fast the missile travels.
The setting up of dx and dz happens in the keyboard event handler, but since the missile moves automatically, the actual movement code is in the game loop. Note that the game loop tries to move the missile immediately so we have to stop the missile by initializing dx and dz to zero in init().
STEP 6: DO COLLISION DETECTION
<!doctype html>
<html>
<head>
<script src="babylon.max.js"></script>
<script>
window.addEventListener("DOMContentLoaded", init);
window.addEventListener("keydown", herocontrol);
function init()
{
    canvas=document.getElementById("cvGame");
    engine=new BABYLON.Engine(canvas);

    scene=new BABYLON.Scene(engine);
    light=new BABYLON.HemisphericLight("sun", new BABYLON.Vector3(0,1,0), scene);
    ground=BABYLON.MeshBuilder.CreateGround("mGround", {width:1000,height:1000}, scene);
    ground.material = new BABYLON.StandardMaterial("gMat", scene);
    ground.material.diffuseColor=new BABYLON.Color3(0,.5,0);

    hero = BABYLON.MeshBuilder.CreateCylinder("cHero", {height:10,diameterBottom:10,diameterTop:0}, scene);
    hero.material=new BABYLON.StandardMaterial("mHero", scene);
    hero.material.diffuseColor=new BABYLON.Color3(0,0,1);
    hero.position=new BABYLON.Vector3(-20, 5, 0);
    hero.rotation.z=-Math.PI/2;
    hero.computeWorldMatrix(true);

    mons= BABYLON.MeshBuilder.CreateCylinder("cMons", {height:10,diameterBottom:10,diameterTop:0}, scene);
    mons.material=new BABYLON.StandardMaterial("mMons", scene);
    mons.material.diffuseColor=new BABYLON.Color3(1,0,0);
    mons.position=new BABYLON.Vector3(20, 5, 0);
    mons.rotation.z=-Math.PI/2;
    mons.computeWorldMatrix(true);

    boom = BABYLON.MeshBuilder.CreateCylinder("cBoom", {height:10,diameterBottom:4,diameterTop:0}, scene);
    boom.material=new BABYLON.StandardMaterial("mBoom", scene);
    boom.material.diffuseColor=new BABYLON.Color3(1,.5,0);
    boom.position=new BABYLON.Vector3(0,5,20);
    boom.rotation.z=-Math.PI/2;
    boomdx=boomdz=0;
    boom.computeWorldMatrix(true);

    camera =new BABYLON.FreeCamera("mCam", new BABYLON.Vector3(0,6,-50), scene);
    camera.attachControl(canvas);
    gameover=false;
    engine.runRenderLoop(gameloop);
}
function gameloop()
{
    if (!gameover) {
    monsdx=hero.position.x-mons.position.x;
    monsdz=hero.position.z-mons.position.z;
    monsang=Math.atan2(monsdz,monsdx);
    monsspd=0.05;
    mons.position.x+=Math.cos(monsang)*monsspd;
    mons.position.z+=Math.sin(monsang)*monsspd;
    mons.rotation.y=-monsang;
    if (mons.intersectsMesh(hero,true)) {
        gameover=true;
        spWinLose.innerHTML="YOU DIED!";
    }

    boom.position.x+=boomdx;
    boom.position.z+=boomdz;
    if (boom.intersectsPoint(mons.position)) {
        gameover=true;
        spWinLose.innerHTML="YOU WIN";
    }
    }
    scene.render();
}
function herocontrol(event)
{
    switch (event.key) {
        case 'a':
            hero.rotation.y-=Math.PI/180;
        break;
        case 'd':
            hero.rotation.y+=Math.PI/180;
        break;
        case 'w':
            heroang=-hero.rotation.y;
            herospd=1;
            herodx=Math.cos(heroang)*herospd;
            herodz=Math.sin(heroang)*herospd;
            hero.position.x+=herodx;
            hero.position.z+=herodz;
        break;
        case 's':
            heroang=-hero.rotation.y;
            herospd=1;
            herodx=Math.cos(heroang)*herospd;
            herodz=Math.sin(heroang)*herospd;
            hero.position.x-=herodx;
            hero.position.z-=herodz;
        break;
        case 't':
            camera.position.y=200;
            camera.position.x=camera.position.z=0;
            camera.rotation.x=Math.PI/2;
        break;
        case 'Enter':
            boom.position.x=hero.position.x;
            boom.position.z=hero.position.z;
            boom.rotation.y=hero.rotation.y;
            boomang=-boom.rotation.y;
            boomspd=1;
            boomdx=Math.cos(boomang)*boomspd;
            boomdz=Math.sin(boomang)*boomspd;
        break;
    }
}
</script>
<style>
body    {width:100%; height:100%; padding:0; margin:0; background:red;}
#cvGame {position:absolute;width:100%; height:100%; padding:0; margin:0; background:skyblue;}
</style>
</head>
<body>
<canvas id="cvGame"></canvas>
<span id="spWinLose" style="position:absolute;bottom:0;right:0;">SIMPLEX</span>
</body>
</html>
Explanation. Collision detection checks if one object collides with another, and it is trivial. Each object possesses its own collision functions: intersectsMesh and intersectsPoint. To check if a monster hits a hero, you use intersectsMesh(hero). To check if a missile hits the middle of a monster, you use intersectsMesh(mons.position).
If there is a collision, the game ends, as controlled by the gameover boolean. And either “You Win” or “You Died” is printed in the lower right corner of the screen.
NEXT STEPS
In the next tutorial, we’ll clean up the code and make it more modular. This will allow us to easily add more monsters, more missiles, and to change the AI of monsters, as well as the behaviors of all objects.
But it’s important that you experiment with this code. Trying different meshes. Adding more commands for the hero. Adding random starting positions for the hero and monster. Maybe making the hero pick up the missile before firing it. Maybe having the missile only travel a certain distance from the hero.
There are many things you can try before we clean refactor the code.